Canopy Rental Installation Tips:
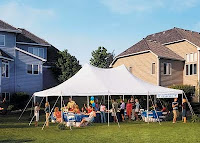 Rental Canopies (Tents) are not hard to install, and they can save you a lot of money.
Most people can set them up in about an hour. You need at least two people and preferably four (one for each corner).
During installation, questions may come up about how to complete a part of the install in the best and easiest way, or what a particular part is for.
For instance, you may notice there are thin ropes hanging next to each side pole and center pole. They are called “Jump Ropes” and are tied to each of the side poles and center poles to keep the tent top from jumping off the pin at the top of the pole. Once the top lifts off the pin, the pole could either fall over or punch a hole in the tent top.
Many people don’t know what jump ropes are for and don’t use them. It is smart to use them to prevent injury to your guests. It can also save you money in repair costs. Not to mention the holes, that once made by the pole will leak profusely during a rain all over your event.
Tip #1:
How do you tie a Jump Rope?

The Jump Rope should be pulled tight toward the ground and tied to the pole. This will keep the tent top tightly pulled against the top of the pole. Wind lift will then not be able to float the tent top off the pole’s pin.
Working backwards in the process, we come to side pole installation. Side poles hold up the perimeter of the tent. They also take a lot of weight off the tent top, which makes it easier to install the center poles.
Tip #2:
What’s the best way to install side poles (and center poles)?

Starting at the four corners: put the pin on top of the side pole through the grommet (and steel plate if there is one) in the tent top. Stand the pole up and swing the bottom of the pole towards the inside of the tent so it is slanted. You may need to loosen the stake rope a little to allow the pole to be lifted.
The bottom of the pole is now tilted diagonally into the center of the tent (about 2 to 3 feet in from the edge of the tent). Tie the “Jump Rope” onto the side pole (see above). Also tighten the stake rope just tight enough to hold the pole from falling over (but not as tight as you can make it. Do the same with the other three corners.
The four corner poles with their bottoms tipped towards the center of the tent will balance the tent top. Four people doing a corner at the same time makes this part of the tent install much easier.
The remaining side poles along the middle edges of the tent can now be installed in the same way. Make sure the stake ropes are not as tight as they can be or it will be very difficult or impossible to lift the center poles.
Now is the time to install the center pole(s). One person holds the center pole at the top (near the pin) and another can follow with the other end of the pole. The person near the pin goes under the tent first and finds the center pole hole. Once the sky can be seen through the hole it is time to put the center pole pin through it.
If the stake ropes are not too tight, one person can put the center pole in, but it is easier with two. Stand the center pole vertical and tie the “Jump Rope” to it. Do the same with the remaining center poles.
Go back to the corner side poles at this point. Adjust the tension on the stake rope so it is not too tight. Stand the previously tipped corner side pole straight up and check the stake rope tension. It should be very tight. If not, tip the pole inward again and tighten the stake rope slightly then stand it up again. This method will tighten the stake ropes tighter than any knot. Do this with the other three corners next and then all the remaining side poles.
Your tent top will be tight as a drum when the stake layout and stake rope tightening methods above are used. The fabric will not flap in a slight breeze and there will be no drooping between side poles.
Tip #3:
How do you get a “floating” side pole to stay down?
In some cases, the ground at the canopy site is not too level. It can rise or fall significantly between adjacent side poles. This can cause a middle side pole to “float” between the higher side poles to the left and right of it. There are two ways to help this situation. The first is to put wood shims under the pole to effectively raise the ground. The second is to hammer a wooden stake or rebar next to the offending side pole and lash the pole to it with rope.
After you finish the installation, by tying all other (thicker) ropes to their respective stakes - Step back and look at the Canopy – Does it droop between side poles? Does the wind flap the tent top around (even in a slight breeze)?
Chances are, the stake lines are either misaligned or too loose.
Tip #4:
How do you make the tent top tighter?
Aligning the stakes properly is the first step to a tighter tent top. At this stage of the tent install, the tarp is on the ground and the tent top is on top of it. The tent top is pulled out so that it is in the shape of a square or rectangle (the tent size determines this). The ropes attached to the tent top show you where the stakes should be hammered into the ground.

At each corner, two stakes needed. Each one should be in line with the edge of the tent top. Lets say you put a long ruler (or string) along the edge of the tent top and drew a line out into the grass (to line up the stake). Drive the stake into the ground about 4 to 5 feet away from the tent on that line. Do the same with the other edge of the tent to locate the second corner stake. If the stakes have a hook on them, aim it away from the tent (it helps hold the stake rope). If you have a good “eye”, a ruler will not be needed.
The stake rope should be tied (or looped if it has a “slider”) loosely over the stake with enough slack to allow the side pole to be installed.
The ropes along the middle of the tent show where the remaining stakes should be hammered in (4 to 5 feet away from the tent). Make your best effort to line the stake up with the stake rope (and side pole grommet) on both sides of the tent to get it straight.
All the stakes are now hammered into the ground and all stake ropes are tied to the stakes.
When your event is over and it is time to take down the Canopy, all the stake ropes are loosened, the bottom of the side poles are tipped inward, and the center poles are removed. The side poles are removed last. Then the stakes are pulled out of the ground.
Tip #5:
How do you get a "stuck stake" out?
Extreme stuck stakes can be avoided by paying attention to how hard it is to bang them into the ground.
If a stake went in the ground hard, it will be just as hard (if not harder) to get out. Once the stake is secure, it is a good idea to stop banging it further into the ground. The time it takes to remove a stuck stake can exceed the time it took to take the entire tent down.
If you are near a large tree, be mindful of the roots. A stake pounded into a root is the absolute hardest to remove. While hitting the stake, try to get a feel for a normal “hit”. You can feel the difference when hitting into a tree root. The ground will also vibrate more as the energy travels along the root.
If you think you are hitting a root (or another unmovable object like a rock), remove the stake and reposition it further away from the tent and the root. Many times you can get an idea of where major roots are by looking at the tree base. The shape of the roots will come off the tree in a “Y”. You should position the stake in the middle of the “Y” if it has to be near the tree. It is better if the tent (or stake line) is located away from large trees.

One way of getting a "stuck stake" out is to hit the side of it with your hammer close to the ground. If it is really stubborn, hit the stake on all four sides. This will make the stake hole larger and enable you to remove it.
Another thing you can try is to spin the stake. This breaks it free from the ground and enables it to be pulled free. Sometimes a bent stake is harder to pull until it is spun to where you can feel less friction. First, try spinning it by hand (or both hands). If this does not work, use channel lock pliers, or a pipe wrench to get it spinning. Many times, just spinning it back and forth will free it.
Mark Saponaro Email me
camelotspecialevents.com


Comments
Post a Comment